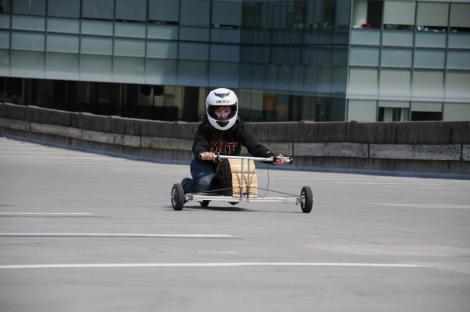
Looks like it’s time for an end-of-project evaluations (apologies for the long-ish post)! Overall impression = impressed. There are a few things I would highlight about our vehicle that I particularly liked:
- Three wheels: I was very happy by how the vehicle handled. A single drive wheel and two for steering was something I really liked and would probably consider again if I were to work on another vehicle. From the pictures I have seen of us riding the kart, the bending was almost completely eliminated, which was awesome, and definitely something we thought about a lot during the design process:
- Wood: I was skeptical about using wood to begin with because I was not sure how to visualize how well it would hold up to being a primary structural component (our original model contained metal out-of-plane supports). Ultimately, it worked very well, and allowed us to make quick touch-ups and additions to the kart without removing the block (hand drill!). It was very easy to screw in the laser cut cover, fit the block precisely to the 80/20, attach the ON/OFF panel, and make adjustments to our rear wheel/motor assembly.
- Steering “wheel”: The steering went through a lot of iterations before we came up with what we finally used. With practice, this was a very comfortable method of steering, and you felt like you were really part of the vehicle when making sharp or sudden turns. +1 fun factor.
- Forward-facing: We started out by sitting on the kart, but soon enough, kneeling forward became the preferred option. It makes you feel like you are moving really fast and smoothly close to the ground.
Naturally, there were things that perhaps should have been implemented differently. Here are some major ones:
- Steering fasteners: We spent a lot of time tightening the bolts on the four-bar linkage, and it didn’t help that we obviously couldn’t tighten them all the way because it would eliminate crucial degrees of freedom. The vertical steel bars were constantly under the influence of moments from inadvertent forward force from the driver. The upper steering handle also wobbled a bit. Thoughts on fixing this? Reduce the hole size on the bars and add some Loctite at a very precise location along the bolt.
- Wiring: We had wires running from the throttle and brakes through a hole in the front of the go kart. It would be best to contain them to prevent damage or accidental removal.
- Rear wheel: The only way to get the darn thing on with our rear motor mount was to used a ground down hex key, which went missing by the end of the semester (which severely limited our ability to tension the chain). It would be helpful to increase the distance between the 80/20 or redesign the rear motor mount.
- Front axle: One of them needs to be reverse-threaded. Enough said.
- Wood comfort: The cover might need to be sanded down in the future (it’s not particularly comfortable for your thighs). Also: add cushions for knees.
- Motor: We were very conscious about money, but frankly, we could have picked up a more powerful motor. We definitely had the money to consider this option.
I was also SUPER impressed by the other karts that emerged from the class this semester. It was really awesome to see how the other three-wheeled karts came out, and the steering methods on all the karts were really diverse and amazing. It was really motivating to have so many people working at the same time and watching the karts grow out of nothing was pretty amazing as well. I’m really happy with the things that I have learned in this class too. I am now extremely comfortable with CADing pretty much whatever I want, drawing motor curves, and I have learned TONS about rapid manufacturing, which I consider a really important skill. It was also very helpful to be able to spec out and order parts I need under a budget because it represents the process I will have to go through in the future (and now I know where to find guard shacks on McMaster, you know, if I ever need one of those).
The last thing I want to do is give a major shout-out to Nelson. We were both kind of hesitant to be partners for the project because, in terms of a chemical reaction, group projects represent a catalyst that ultimately converts a friendship otherwise in equilibrium into a blood bath (seeing as we live on the same floor in our dorm, it would be inconvenient to mop up that up). It turned out to be a really great collaboration, and neither of us minded staying up super late to troubleshoot or do some last minute SolidWorks or communicate whatever issues we were having with the design. That being said, thanks for an awesome spring break, finding those washers 10 times, and all the laughs at the laser cutter late at night.
Thank you to everyone who answered all the questions we had–I couldn’t have asked for a better semester.


